x64 Development and Visual Studio Assembly References

This is a Random Bits post – not on my normal BI related topics, but something I found useful and wanted to record somewhere in case it could help someone else.

I recently upgraded to a new laptop running Vista 64-bit. It’s been a bit of an adventure getting everything working, particularly as I work with several people who are still on XP 32-bit, so I have to make sure I can continue to work with others on shared projects. 

One little piece of information I found was related to Visual Studio. I am working on project (BIDSHelper) that requires file references to a number of assemblies that are not in the global assembly cache (GAC). When you add these references in Visual Studio, a relative path from the IDE is added to the project file that points to the assembly. It’s in the <HintPath> tag in the project file.

Unfortunately, these assemblies are not in the same location in a 64-bit install as they are in a 32-bit install. If I just changed the file reference, it would break everyone else’s project, but I couldn’t move forward without resetting them. However, I found a reference online to using reference paths (found in the Project Properties) to refer to assemblies. This allows you to specify a folder (or folders) that will be searched for assemblies or other items used by the project. In my case, simply adding the folder that the assemblies were in to the Reference Paths allowed me to continue developing without impacting my teammates.

This is probably well known to people who spend more time doing .NET development, but it was definitely helpful for me.

Reference Paths In Books Online

Posted in Uncategorized | Comments Off on x64 Development and Visual Studio Assembly References

Unit Testing In SSIS

I’d put in a request for additional support for unit testing in Integration Services on Connect (https://connect.microsoft.com/SQLServer/feedback/ViewFeedback.aspx?FeedbackID=276292). Unfortunately, it doesn’t look like it will make the cut for SQL Server 2008.

I used automated unit testing extensively when I was more focused on application development, and I really miss having it available in SSIS. In my experience, it made a significant difference in both quality and speed of development. Having a suite of test cases gave developers a safety net and being able to quickly test small units of work made progress much more tangible. (For more on test-driven development and some of the benefits, see http://en.wikipedia.org/wiki/Test-driven_development.)

Given that, maybe it would be worth consider incorporating some unit testing capabilities into the BIDSHelper project (http://www.codeplex.com/bidshelper) or starting another community project to add those capabilities. Any thoughts on what would be good features to include? My list includes:

  • Ability to test tasks individually
  • Ideally, ability to test pipeline components individually
  • Standard xUnit functionality (the ability to set up and tear down a test)
  • Some support for setting the database to a known state prior to the test would be valuable

Any other thoughts would be welcome.

Posted in Uncategorized | Comments Off on Unit Testing In SSIS

Processing a Flat File with Header and Detail Rows

It’s been tough finding time to write any content recently, but this was a scenario that came up recently both at work and on the forums, so I decided to write it up. It’s another variation on processing flat files (they seem to be endless). This scenario deals with an input file that contains two types of records, headers and details. This processing for this is based off another post (Handling Flat Files with a Varying Number of Columns), so I’m only going to cover what is unique in this scenario.


The input file looks like this:


HL111Header1
DLDetail1
DLDetail2
HL222Header2
DLDetail3
DLDetail4

The rows that begin with HL are header lines, the rows with DL are detail lines. One additional requirement in this example is that the header code (the three digits following the HL in each header line) must be included into each detail row.


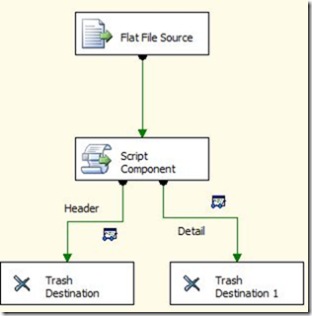
The data flow looks like this:


HeaderDetail Data Flow


The Flat File Source is bringing in each row as a single column, delimited by CR/LF. The script component has two outputs defined, both as synchronous, and with an exclusion group greater than zero. (For more info on this, please see this post from Jamie Thompson.) One output will include the Header row, and the other will include the Detail rows. Note that each output must have unique column names defined.


The script appears below. It is simply parsing the Line column (that contains the entire row of data), and putting the values into the appropriate columns on each output. Note that the headerCode variable is stored each time a header row is encountered, and then used to populate the code value on the detail output. 


Public Class ScriptMain
Inherits UserComponent
Private headerCode As Integer

Public Overrides Sub Input0_ProcessInputRow(ByVal Row As Input0Buffer)
If Row.Line.Substring(0, 2) = “HL” Then
headerCode = CType(Row.Line.Substring(2, 3), Integer)
Row.DirectRowToHeader()
Row.HRRecordType = Row.Line.Substring(0, 2)
Row.HRCode = CType(Row.Line.Substring(2, 3), Integer)
Row.HRName = Row.Line.Substring(5)
ElseIf Row.Line.Substring(0, 2) = “DL” Then
Row.DirectRowToDetail()
Row.RecordType = Row.Line.Substring(0, 2)
Row.Code = headerCode
Row.Name = Row.Line.Substring(2)
End If
End Sub

End Class


There it is. Fairly straightforward, but it was quick to put together. The sample files are attached below.

Posted in Uncategorized | Comments Off on Processing a Flat File with Header and Detail Rows

SQL Server 2008 – Using Merge From SSIS

In my last post, I talked about using the new MERGE statement in SQL Server 2008. It allows you to merge the data in a result set with a table, based on a join condition that you specify. This is a common scenario in data warehousing, where you often need to take a working table and compare it to a target table to determine if a row should inserted, updated, or deleted. This is often the case for dimension table. Currently, there is no SSIS component in the June 2007 CTP that leverages the MERGE statement directly. This post will explore one possible pattern for using MERGE from SSIS.

In SSIS 2005, a commonly used pattern for updating dimension tables was to retrieve all of the rows intended for the dimension table in a data flow via a source component. Then the rows would be run through a lookup component to determine if they existed in the target table. Rows to be updated (those found in the lookup) would be run through an OLE DB Command component. Rows to be inserted would be sent to an OLE DB Destination.

image

In cases where performance is a concern, the OLE DB Command could be replaced with another OLE DB Destination that writes all rows to be updated to a temporary table. In the control flow, an Execute SQL task would issue an UPDATE statement, using the temporary table as a source.

image

To implement this using a MERGE statement, we can modify the second pattern. All rows that are read from the source should be written to a temporary table. Then, the Execute SQL task will be used to run a MERGE statement that uses the temporary table as the source for the merge. The matching of the rows will be done through the join condition in the MERGE statement.

image

Why would using the MERGE statement be better than using the lookup pattern described above? For one thing, the data flow is simpler, with no branches in execution. Also, the data flow only has to write to a single table, instead of two tables. I haven’t done any performance testing on the MERGE statement yet, so I can’t say for certain whether it is faster.

I’m still hoping for a destination component that can be used directly in the data flow to perform the MERGE, but the SSIS team has indicated that it probably won’t happen.

Posted in Uncategorized | Comments Off on SQL Server 2008 – Using Merge From SSIS

Using the Merge Statement in SQL Server 2008

It’s been a busy couple of weeks, but I’ve finally found some time to play around with the June CTP of SQL Server 2008. One of the items that caught my interest was the MERGE statement. This is a new addition to the T-SQL language that lets you perform INSERTs, UPDATEs, and DELETEs against a table in a single statement. You specify a source table to compare to, and what conditions should result in an UPDATE vs. an INSERT.

This is a fairly common scenario in data warehousing, where you may need to either insert new rows into a fact table, or update existing rows with new information. Here’s a an example scenario to illustrate this. A store sends an hourly feed of transactions that have occurred in the last hour. You need to populate a fact table that should contain a monthly total for each customer, showing how many of each product were purchased in the month and how much was spent. The fact table needs to updated each time the hourly sales transaction comes in, so that it is always current. And you have to take into account that a customer may have already purchased an item in the same month, so you may need to update an existing row in the fact table rather than insert a new one.

Our fact table looks like this:

CREATE TABLE [dbo].[FactProductSalesSnapshot](
    [DimCustomerID] [int] NOT NULL,
    [PurchaseDateID] [int] NOT NULL,
    [DimProductID] [int] NOT NULL,
    [Quantity] [int] NOT NULL,
    [SalesAmount] [money] NOT NULL
)

and the merge table (the source for the MERGE statement) looks like this:

CREATE TABLE [dbo].[SalesTransactionStage](
    [SalesTransactionID] [int] NOT NULL,
    [CustomerID] [int] NOT NULL,
    [DateID] [int] NOT NULL,
    [ProductID] [int] NOT NULL,
    [Quantity] [int] NOT NULL,
    [SalesAmount] [money] NOT NULL,
    [BatchID] [tinyint] NOT NULL
)

The batch ID indicates which batch of hourly sales transactions this row belongs to. To merge this in, you’d execute the following statement:

MERGE FactProductSalesSnapshot AS fact
USING (
  SELECT 
      CustomerID
      ,DateID
      ,ProductID
      ,Quantity
      ,SalesAmount
  FROM SalesTransactionStage
 WHERE BatchID = 4
) AS src
ON (    fact.DimProductID = src.ProductID 
    AND fact.DimCustomerID = src.CustomerID 
    AND fact.PurchaseDateID = src.DateID )
WHEN MATCHED THEN
    UPDATE SET 
        fact.Quantity = fact.Quantity + src.Quantity
        ,fact.SalesAmount = fact.SalesAmount + src.SalesAmount  
WHEN NOT MATCHED THEN
    INSERT (DimCustomerID, PurchaseDateID, DimProductID, Quantity, SalesAmount)
        VALUES (src.CustomerID, src.DateID, src.ProductID, src.Quantity, src.SalesAmount);


To break this statement down a little bit, the USING (..) portion defines the source for the Merge to use for comparisons (the SalesTransactionStage table defined previously). The ON clause works like the ON clause in a JOIN statement, and determines how the source is matched against the target. In this case, we’re joining on the Product, Customer, and Date keys.

The WHEN MATCHED clause determines what should happen if we find a match. We are performing an UPDATE, and adding the values from the stage table to existing balance in the fact table. WHEN NOT MATCHED indicates that this particular combination of product, customer, and date does not yet exist, so the new values are inserted.

The WHEN clauses also support conditional logic, so we could add additional logic to catch returns (where the quantity is less than zero) and store that information in a separate column.

Overall, the MERGE statement seems to work very well, and I think it will be very useful if you are building warehouses on SQL Server. I’m planning on a part 2 to this to show how MERGE can be used from Integration Services. Currently, there doesn’t appear to be a direct way to leverage it, outside of an Execute SQL statement, which has some drawbacks. I am curious to see if Microsoft introduces a new destination component for the pipeline that takes advantage of the MERGE functionality.

 
Posted in Uncategorized | Comments Off on Using the Merge Statement in SQL Server 2008

XML Transformations Part 2

Previously, I posted about using a script destination component to output an XML file. A post on the MSDN forums got me thinking about a slight tweak to the previous post that would result in a little more flexibility. The poster wanted to create an XML string containing his row values to save into a column of a database table. So instead of script destination, what was needed here was a script transform to create a new column.

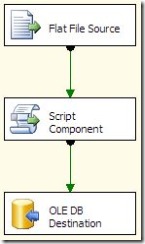
The data flow is straightforward – a source, script transform, and a OLEDB Destination.

DataFlow

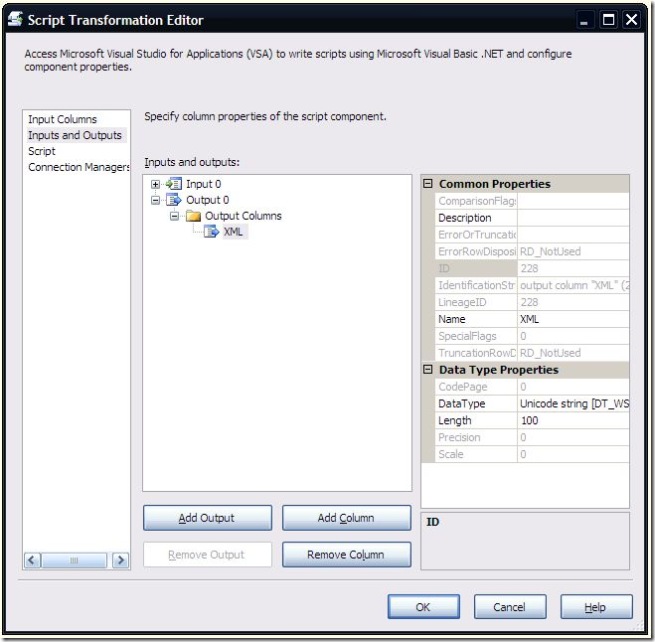
In the script component, each column from the input file is selected. I added a single output column (XML) to hold the results of the script task.

ScriptInput

The script used is below:

Imports System
Imports System.Data
Imports System.Math
Imports Microsoft.SqlServer.Dts.Pipeline.Wrapper
Imports Microsoft.SqlServer.Dts.Runtime.Wrapper
Imports System.Reflection

Public Class ScriptMain
    Inherits UserComponent

    Private Const rowElement As String = "Row"

    Public Overrides Sub Input0_ProcessInputRow(ByVal Row As Input0Buffer)
        Dim column As IDTSInputColumn90
        Dim rowType As Type = Row.GetType()
        Dim columnValue As PropertyInfo

        Dim newXML As String

        newXML = (FormatElement(rowElement))
        For Each column In Me.ComponentMetaData.InputCollection(0).InputColumnCollection
            columnValue = rowType.GetProperty(column.Name)
            newXML += ((FormatElement(column.Name) + columnValue.GetValue(Row, Nothing).ToString() + FormatElement(column.Name, True)))
        Next
        newXML += (FormatElement(rowElement, True))
        
        Row.XML = newXML
    End Sub

    Private Function FormatElement(ByVal elementName As String) As String
        Return FormatElement(elementName, False)
    End Function

    Private Function FormatElement(ByVal elementName As String, ByVal closingTag As Boolean) As String
        Dim returnValue As String
        If closingTag Then
            returnValue = "</"
        Else
            returnValue = "<"
        End If
        returnValue += elementName + ">"

        Return returnValue
    End Function

End Class

The script is very similar to the one from the previous article, though it is a bit simpler. The XML values are prepared by iterating through the Input Collection metadata, and using the Reflection classes to read the Row object dynamically. The resulting value is put into the XML column on the output.

The OLEDB Destination simply maps the XML column to an XML column on a database table.

This is a good alternate approach to the previous one, particularly if you need to send the XML to a database instead of a flat file.

Posted in Uncategorized | Comments Off on XML Transformations Part 2

Multi-File Outputs Part 2

In my previous post, I discussed how to use a script destination to output multiple flat files from a single source. In it, I mentioned that I would post an alternate approach, that didn’t require any scripting. So, here it is.


This is using the same example data as the previous post, a source file that looks like:


NAME;VALUE;DATE
A;1;1/1/2000
A;2;1/2/2000
A;3;1/3/2000
A;4;1/4/2000
A;5;1/5/2000
B;1;1/1/2000
B;2;1/2/2000
B;3;1/3/2000
B;4;1/4/2000
B;5;1/5/2000
C;1;1/1/2000
C;2;1/2/2000
C;3;1/3/2000
C;4;1/4/2000
C;5;1/5/2000

The goal is to output one file containing all “A” rows, one with “B” rows, and one with “C” rows.


The control flow consists of a Data Flow, ForEach container, and another Data Flow.


MultiFile 2


The first data flow is used to get the number of “slices” in the original file, and the data to identify each slice. The results are stored in a recordset object that is used by the ForEach loop. In the recordset, I expect to see three records, with the values A, B, and C. To get that from the source, I can either use a conditional split, or an aggregate transform. Important: you do not need both; I am only including both approaches as examples. If you implement this as a real solution, please only use the approach that best suits your needs.


GetSliceDF


The aggregate transform is set to group by and pass through the Name column from the source file.


Aggregate


The condition split works by looking for rows with a value of 1. Those are the only rows passed to the recordset destination.


CondSplit


The choice of which one to use really depends on how complex the rules for determining how many files you need are. If it is based on a single column, or set of columns, the aggregate transform works well. For more complex logic, the conditional split is probably more appropriate.


Once the recordset is populated, it is stored in a variable. There are two defined, one to hold the results of the conditional split (splitRowList), and one to hold the results of the aggregate transform (aggregatedRowList). Again, you don’t need both. The aggregatedRowList is the one used for the rest of this example.


Variables


The Foreach loop is set to use the aggregatedRowList variable.


ForEach1


The first column of the recordset (the Name column) is mapped to the currentSlice variable. This is what is used in the data flow to determine whether the row should be included in the output. It is also used in an expression for the currentFile variable, which is also used to set the ConnectionString property of the Destination File connection manager:

“C:\OutputDir\” + “Output” +  @[User::currentSlice] + “.txt”

This updates the destination filename for each iteration of the loop.


ForEach


In the data flow, the source and destination are fairly straightforward.


DataFlow1


In the conditional split, the currentSlice variable is compared to the Name column to determine if this row should be included in the output. More complex logic could be included here fairly easily.


CondSplit1


That’s pretty much all there is to it.


Why would you want to use this approach over using a script? For one, this would be easy to adapt to multiple table destinations, instead of flat files. Two, this approach does not care about whether the rows are sorted or not. However, it is reliant on the conditional split, so the logic for which output a row belongs in needs to be something that can be implemented in a conditional split. And it does require multiple passes through the source rows. The script approach seems to be better suited to sequential, single pass file processing.

Posted in Uncategorized | Comments Off on Multi-File Outputs Part 2

Multi-File Output Destination Script Component

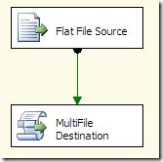
Yesterday I posted about using a destination script component to write XML files from a data flow. Today, I’m continuing in the same vein with a post about writing multiple destination files from a destination script component. The inspiration for this was a post on the MSDN forums where a developer described a scenario where he had a single file and needed to split it into multiple output files based on some conditional logic. Normally, this could be handled with a conditional split and multiple destinations, but the catch in his scenario was that he didn’t know how many destination files he would need.


Based on that, I worked up a quick script destination to accomplish his goal. Later, I’m also going to post an alternative approach that does not use any script.


Multifile Destination


The data flow is fairly straightforward. The flat file source is retrieving a flat file with the following data:


NAME;VALUE;DATE
A;1;1/1/2000
A;2;1/2/2000
A;3;1/3/2000
A;4;1/4/2000
A;5;1/5/2000
B;1;1/1/2000
B;2;1/2/2000
B;3;1/3/2000
B;4;1/4/2000
B;5;1/5/2000
C;1;1/1/2000
C;2;1/2/2000
C;3;1/3/2000
C;4;1/4/2000
C;5;1/5/2000

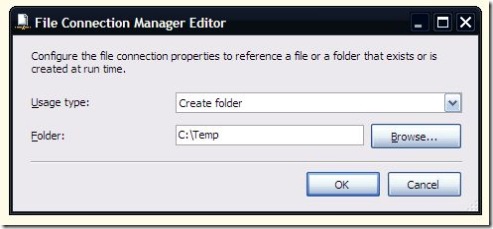
The goal is to output three files, one each for the A, B, and C rows. I used a folder connection rather than a specific flat file connection. The folder connection specifies the output directory to place the files in.

DestinationFolder

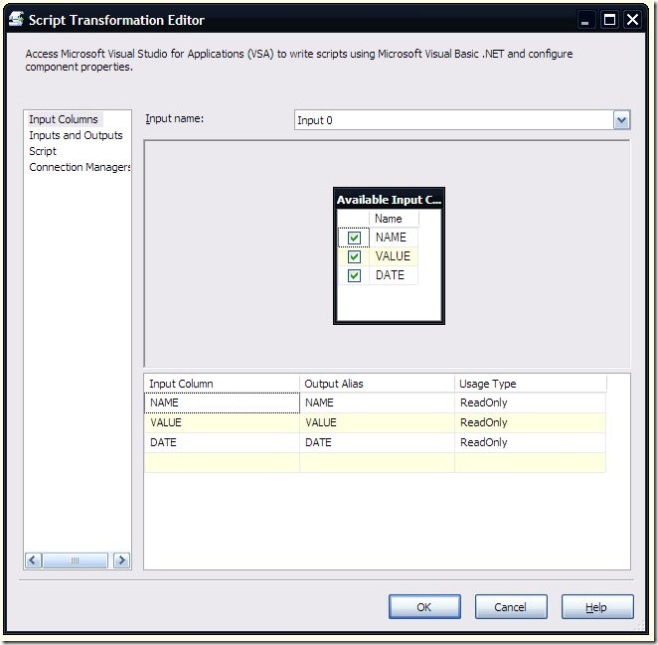
On the script task (created as a destination), all the available input columns were selected.

Script Inputs

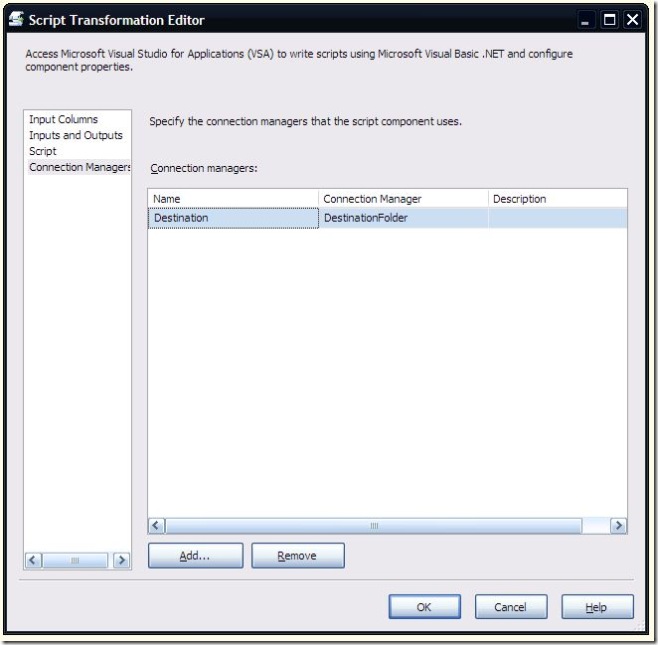
The Destination Folder is specified on the Connection Managers page.

ConnMgr

The script is as follows:

Imports System
Imports System.Data
Imports System.Math
Imports Microsoft.SqlServer.Dts.Pipeline.Wrapper
Imports Microsoft.SqlServer.Dts.Runtime.Wrapper
Imports System.IO

Public Class ScriptMain
Inherits UserComponent

Private Const fileName As String = “Output”
Private Const fileExt As String = “.txt”
Private Const delimiter As String = “;”
Private targetFolder As String
Private fileWriter As StreamWriter
Private fileCount As Int32 = 1
Private previousValue As String = String.Empty

Public Overrides Sub AcquireConnections(ByVal Transaction As Object)
targetFolder = CType(Me.Connections.Destination.AcquireConnection(Nothing), String) + “”
End Sub

Public Overrides Sub PostExecute()
fileWriter.Close()
End Sub

Public Overrides Sub Input0_ProcessInputRow(ByVal Row As Input0Buffer)
Dim column As IDTSInputColumn90

If Not Row.NAME = previousValue Then
If Not fileWriter Is Nothing Then
fileWriter.Close()
End If
fileWriter = New StreamWriter(targetFolder + fileName + fileCount.ToString() + fileExt, False)
fileCount += 1
previousValue = Row.NAME
End If

With fileWriter
.Write(Row.NAME + delimiter)
.Write(Row.VALUE.ToString() + delimiter)
.WriteLine(Row.DATE.ToString() + delimiter)
End With
End Sub

End Class


The most interesting portion of this script is in the ProcessInputRow method. The initial section of the method checks to see if the current row Name value is the same as the previous row. If it is different, it closes the current file, opens a new one, and increments a counter for the file name. Then the current row values are written out to the file.

This script works well for outputting multiple files. In the script, I’m using a simple previous value comparison to see if  I need to start a new file, but the logic could be much more complex if necessary.

An advantage of this approach over the non-script approach is that it only requires one pass through the source file. Another advantage is that the comparison logic can be fairly complex and can easily handle triggering new file creation based on number of rows or a trigger row. The pure SSIS approach can’t handle that as easily. However, this approach does require that your rows are sorted properly before being fed into the destination, whereas the alternate approach can handle the rows in any order.

Posted in Uncategorized | Comments Off on Multi-File Output Destination Script Component

XML Destination Script Component

I often hear comments along the lines of “Why doesn’t SSIS have an XML destination?”. Unfortunately, I don’t know the answer to that, but I can show you how to implement your own XML destination fairly easily. Thanks to the magic of the script component, it doesn’t take much work at all. This was also a good opportunity for me to use a destination script component, as I haven’t had much need for this in my work.


One caveat to this is that I have kept the XML format very simple and very generic. You can customize the script to handle more complex scenarios, but I’d imagine there would be a lot of work in producing a component that can handle all the different ways of formatting data in XML. Maybe that’s why MS didn’t include it out of the box 🙂


As an example, I have a very simple package with a single data flow. The data flow has a flat file source, and a script destination component.
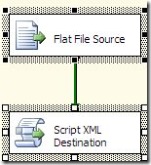

XML Dest


The flat file source is standard, nothing interesting there. The work is all done in the script. When adding the script component, make sure to specify that it is a destination component.


When configuring the script component destination, I chose all the input columns that I wanted to include in the XML (in this case, all of the columns from my flat file).
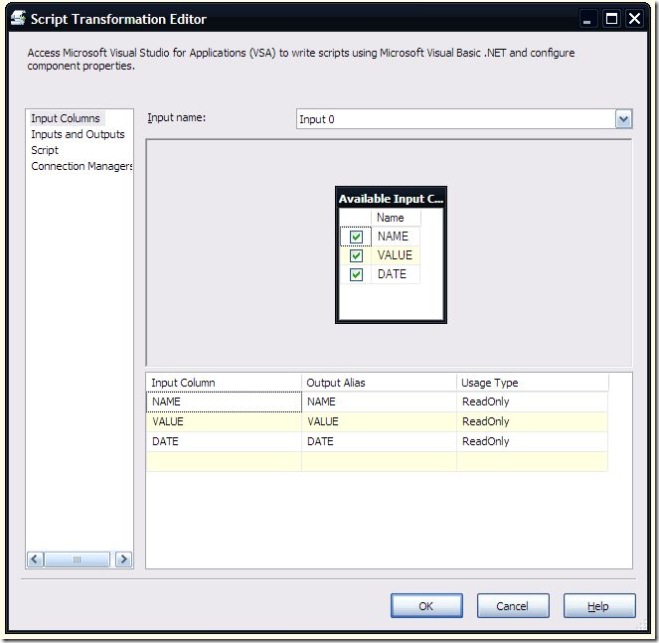

DestScriptColumns


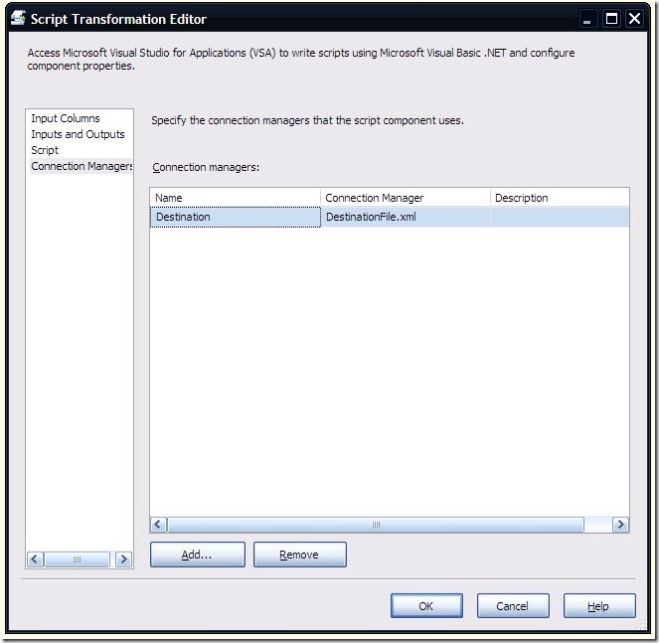
There is no need to alter anything on the Inputs and Outputs page. Since this is a destination component, no output is necessary. On the Connection Managers page, I added a reference to a connection manager of type “File”, and named it Destination.

DestScriptCM


This is the complete script for the component. I’ll explain it section by section below.

Imports System
Imports System.Data
Imports System.Math
Imports Microsoft.SqlServer.Dts.Pipeline.Wrapper
Imports Microsoft.SqlServer.Dts.Runtime.Wrapper
Imports System.IO
Imports System.Reflection

Public Class ScriptMain
Inherits UserComponent

Private targetFile As String
Private xmlWriter As StreamWriter
Private rootElement As String = “Root”
Private rowElement As String = “Row”

Public Overrides Sub AcquireConnections(ByVal Transaction As Object)
targetFile = CType(Me.Connections.Destination.AcquireConnection(Nothing), String)
End Sub

Public Overrides Sub PreExecute()
xmlWriter = New StreamWriter(targetFile, False)
xmlWriter.WriteLine(FormatElement(rootElement))
End Sub

Public Overrides Sub PostExecute()
xmlWriter.WriteLine(FormatElement(rootElement, True))
xmlWriter.Close()
End Sub

Public Overrides Sub Input0_ProcessInputRow(ByVal Row As Input0Buffer)
Dim column As IDTSInputColumn90
Dim rowType As Type = Row.GetType()
Dim columnValue As PropertyInfo

With xmlWriter
.Write(FormatElement(rowElement))
For Each column In Me.ComponentMetaData.InputCollection(0).InputColumnCollection
columnValue = rowType.GetProperty(column.Name)
.Write(FormatElement(column.Name) + columnValue.GetValue(Row, Nothing).ToString() + FormatElement(column.Name, True))
Next
.WriteLine(FormatElement(rowElement, True))
End With
End Sub

Private Function FormatElement(ByVal elementName As String) As String
Return FormatElement(elementName, False)
End Function

Private Function FormatElement(ByVal elementName As String, ByVal closingTag As Boolean) As String
Dim returnValue As String
If closingTag Then
returnValue = “</”
Else
returnValue = “<“
End If
returnValue += elementName + “>”

Return returnValue
End Function

End Class


I added the System.IO and System.Reflection to the Imports as I am using objects from both namespaces. There are 4 class level variables defined:

    Private targetFile As String
Private xmlWriter As StreamWriter
Private rootElement As String = “Root”
Private rowElement As String = “Row”

xmlWriter is a StreamWriter, the .NET Framework object used to create the XML file. For more information on this, please see the MSDN documentation. rootElement is the value to enclose the entire XML document with, and rowElement defines what to enclose each individual row in. By changing the values in these variables, you affect what the final XML output looks like.


targetFile holds the path and file name for the destination file. It is set in the AcquireConnections method. Interesting note: when you are working with a file connection manager, calling AcquireConnection simply returns the path and file name of the file. Why not just use a variable or set it explicitly? Doing it this way makes the script behave more like a standard SSIS destination, and makes it clearer what you’d need to change to put the file in a new destination. As a plus, if you set an expression or configuration on the ConnectionString property of the file connection manager, the script will use it automatically.

    Public Overrides Sub AcquireConnections(ByVal Transaction As Object)
targetFile = CType(Me.Connections.Destination.AcquireConnection(Nothing), String)
End Sub

In the PreExecute method, the code creates a new instance of the StreamWriter, and writes the opening tag of the XML file.

    Public Overrides Sub PreExecute()
xmlWriter = New StreamWriter(targetFile, False)
xmlWriter.WriteLine(FormatElement(rootElement))
End Sub

The ProcessInputRow method is where most of the work occurs. I’m using the System.Reflection and the ComponentMetaData objects to process the Row object dynamically. Essentially, this code determines what input columns are available at runtime, based on what was selected in the Script component’s property pages. It then writes each of those columns to the file, surrounding it with an XML tag based on the column name.

    Public Overrides Sub Input0_ProcessInputRow(ByVal Row As Input0Buffer)
Dim column As IDTSInputColumn90
Dim rowType As Type = Row.GetType()
Dim columnValue As PropertyInfo

With xmlWriter
.Write(FormatElement(rowElement))
For Each column In Me.ComponentMetaData.InputCollection(0).InputColumnCollection
columnValue = rowType.GetProperty(column.Name)
.Write(FormatElement(column.Name) + columnValue.GetValue(Row, Nothing).ToString() + FormatElement(column.Name, True))
Next
.WriteLine(FormatElement(rowElement, True))
End With
End Sub


 Finally, in the PostExecute method, the closing tag is written, and the file is closed.

    Public Overrides Sub PostExecute()
xmlWriter.WriteLine(FormatElement(rootElement, True))
xmlWriter.Close()
End Sub

 With the script component in place, if I read in a text file with these values:


NAME;VALUE;DATE
A;1;1/1/2000
A;2;1/2/2000
A;3;1/3/2000
A;4;1/4/2000
A;5;1/5/2000

I get an output that looks like this:

<Root>
<Row><NAME>A</NAME><VALUE>1</VALUE><DATE>1/1/2000 12:00:00 AM</DATE></Row>
<Row><NAME>A</NAME><VALUE>2</VALUE><DATE>1/2/2000 12:00:00 AM</DATE></Row>
<Row><NAME>A</NAME><VALUE>3</VALUE><DATE>1/3/2000 12:00:00 AM</DATE></Row>
<Row><NAME>A</NAME><VALUE>4</VALUE><DATE>1/4/2000 12:00:00 AM</DATE></Row>
<Row><NAME>A</NAME><VALUE>5</VALUE><DATE>1/5/2000 12:00:00 AM</DATE></Row>
</Root>

The nicest thing about this script, in my opinion, is that it does not have to be modified if the input columns change. The use of the System.Reflection classes allows the code to process the Row object at runtime. This does come at the expense of performance, though, so I wouldn’t recommend using this in high volume scenarios without some tweaks.



Posted in Uncategorized | Comments Off on XML Destination Script Component

Dynamically Unpivoting Columns to Rows

There’s been a few questions on the forums recently about taking column values and pivoting them to rows. For example, I might have an input file with 5 columns: a key column and 4 category columns.


Key; C1; C2; C3; C4
1;1;2;3;4
2;1;2;3;4
3;1;2;3;4
4;1;2;3;4


and I’d like an output that has 2 columns (the key and the category value):


1;1
1;2
1;3
1;4
2;1
2;2
2;3


Since my input has a set number of columns, I can use the Unpivot Transform to get the desired result.


But what if I have a variable number of columns to pivot? In that case the input file might look like this:


1;1;2;3
2;1;2;3;4;5
3;1
4;1;2;3;4;5;6;7;8
5;1;2;3;4;5;6;7;8;9
6;1;2;3


The first column still indicates the key, but there are a variable number of categories. In Handling Flat Files with Varying Numbers of Columns, I showed how to handle the varying number of columns by treating each row as a single column. This post is going to expand on that technique and show how to incorporate a pivot into the script.


The connection manager and the flat file source should be set up the same way as in the previous post, so I won’t cover that again. The difference is in the script component. Since I want to output more rows than I’m getting as inputs, I’m setting the script up with an asynchronous output. That is done by setting the SynchronousInputID property to None. Two columns were added to the output, one for the key, and one for the category value.


This is the code inside the script task:


Dim Values() As String
Dim i As Integer

Values = Row.Column0.Split(CChar(“;”))

‘Array is zero based – but zero index is the key value,
‘so start with 1
For i = 1 To Values.GetUpperBound(0)
    Output0Buffer.AddRow()
    Output0Buffer.Key = CInt(Values(0))
    Output0Buffer.Value = CInt(Values(i))
Next

The Split function is used to break the string up into individual columns in an array. The code loops through the array, starting with the second column, since the first one represents the key. For each iteration through the loop, a row is added to the output buffer, and the key and and value are added to the row.


That’s pretty much all there is to it. This technique can be used to handle flat files and columns that contain multiple items (in XML, or as a delimited list).

Posted in Uncategorized | Comments Off on Dynamically Unpivoting Columns to Rows